


What Can You Build with Webflow? 20+ Real Examples (2026)
Find the possibilities of Webflow! Learn what you can build with Webflow, from simple portfolios to complex interactive applications.
Actionable insights to improve SEO, speed, and conversions
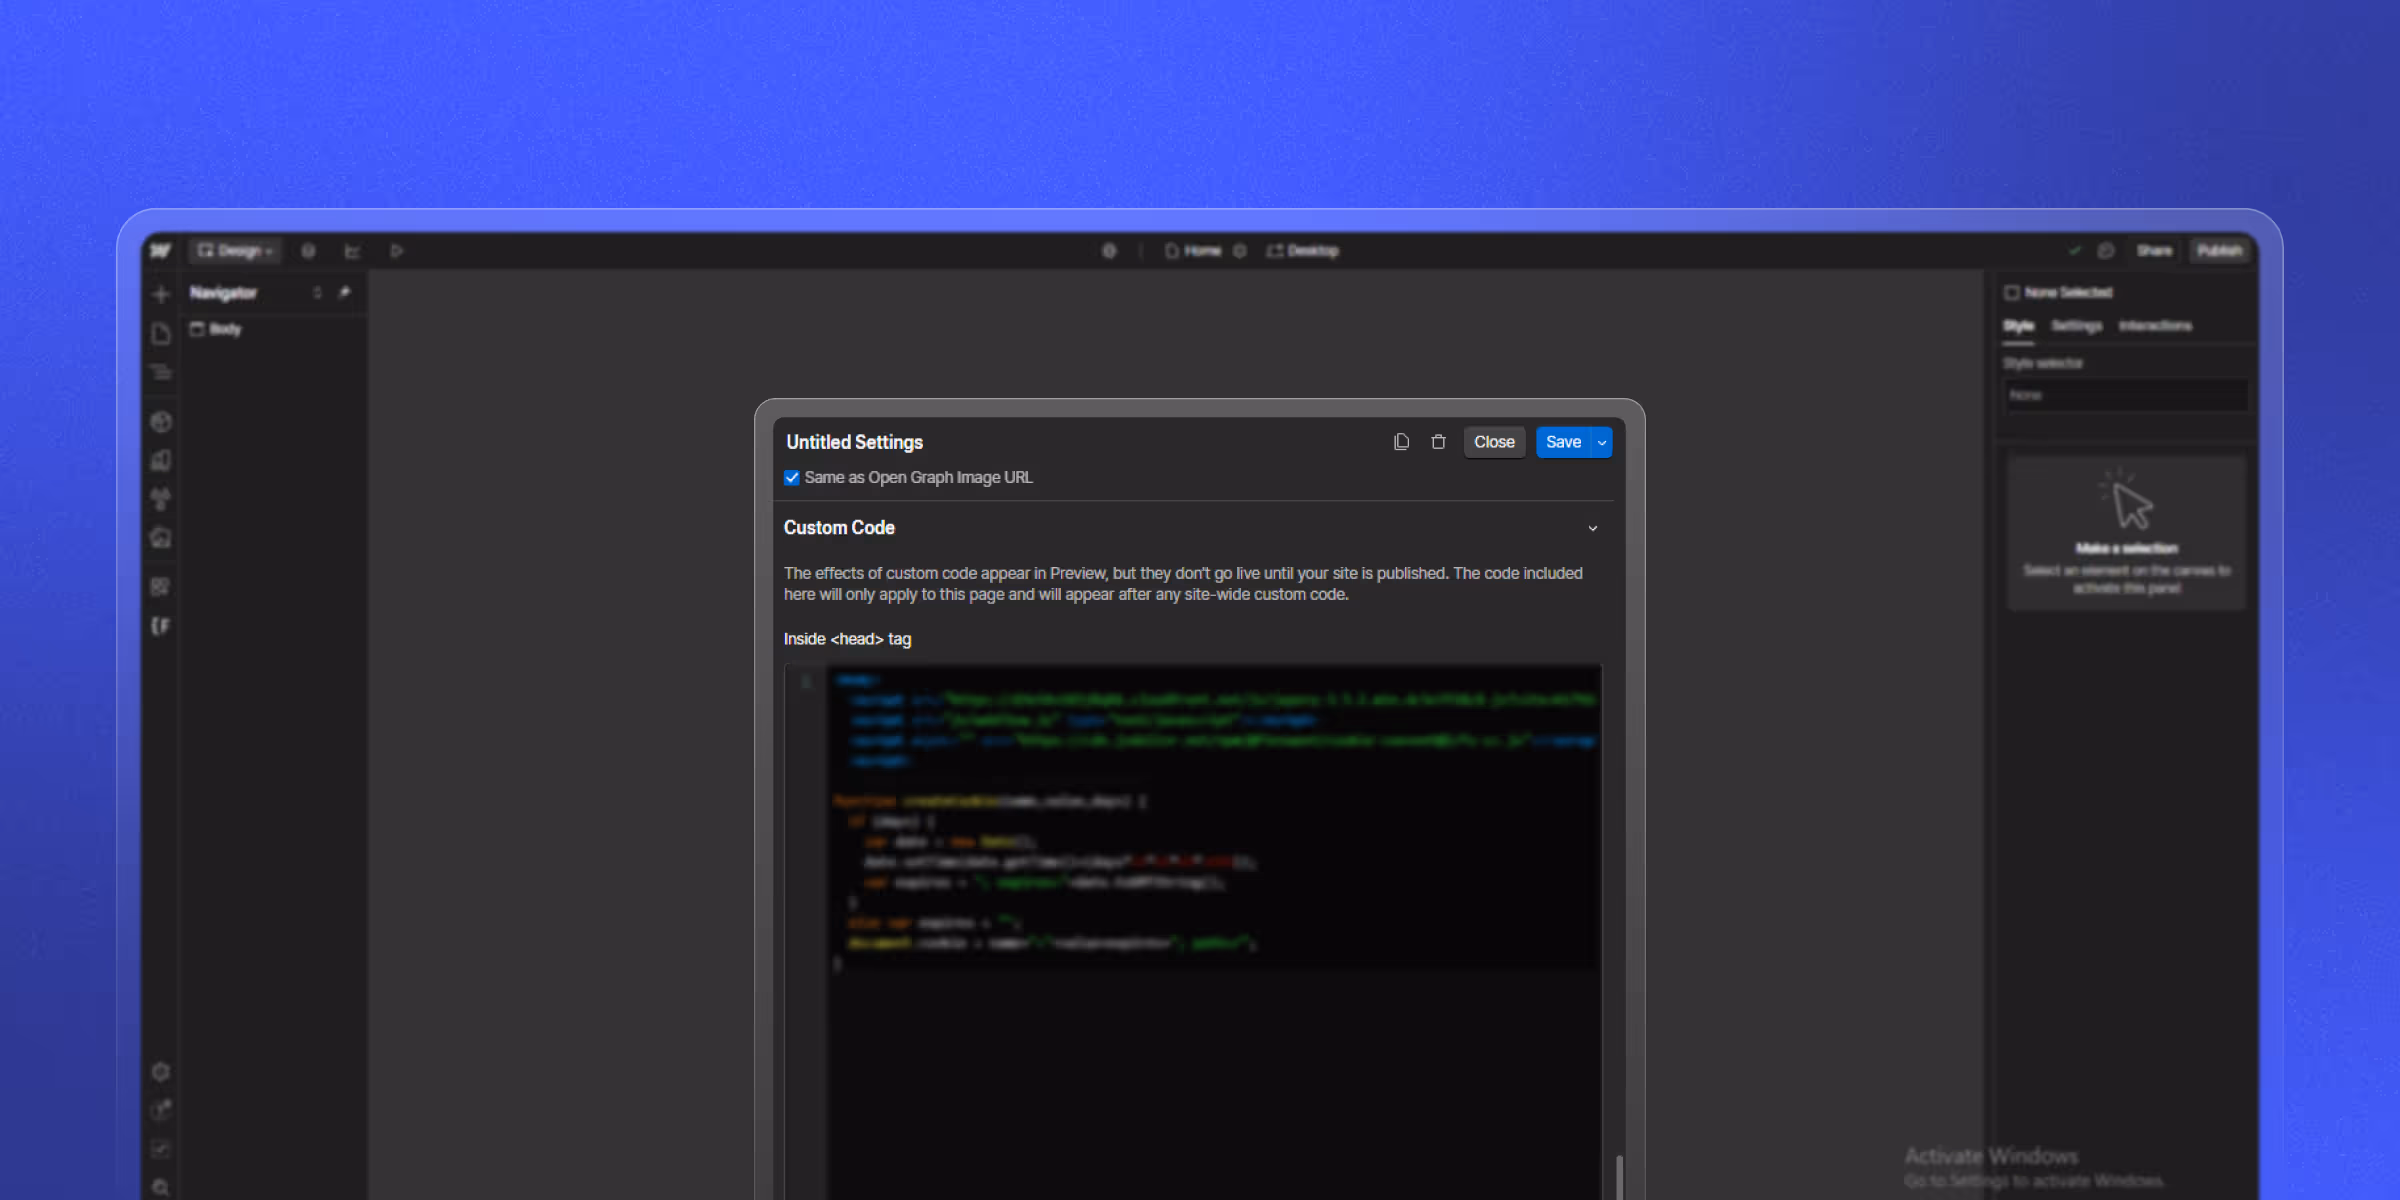
To add schema markup in Webflow, paste JSON-LD inside an Embed element on the target page (Designer → Add Element → Embed), then publish. For sitewide schema like Organization, use Page Settings → Custom Code → Inside <head> tag instead. For CMS collection pages (blogs, product listings), add an Embed element directly to the collection template page body and bind it to a CMS rich-text field containing the JSON-LD Page Settings Custom Code is static and cannot accept CMS field bindings. Always validate with Google's Rich Results Test before publishing to production.
Schema markup is structured data added to your Webflow site that helps Google, Bing, and AI engines like ChatGPT and Perplexity understand your content. Properly implemented schema can earn rich snippets in search results, improve click-through rates, and increase the chance your content gets cited in AI answers. This guide walks through manual setup, common schema types, JSON-LD examples, and how to validate everything works.
If you’re using Webflow, you're already living in a modern environment. We know Webflow is a no-code platform for building high-performance websites. But Webflow excels at design and flexibility; it doesn’t offer built-in schema tools, so you’ll need to implement it manually or through custom integrations.
Schema markup is a vocabulary of tags (developed by Google, Bing, Yahoo, and Yandex) that you add to your website's code so search engines and AI engines can understand the meaning of your content not just the words.
The most useful schema types for a typical Webflow business site are:
By adding schema markup to your site, search engines can display:
This improved visibility often results in better engagement and higher organic CTR.
Here are the top advantages or benefits of implementing schema markup:
After adding schema to your Webflow site, always validate it using Google's <a href="https://search.google.com/test/rich-results" rel="noopener">Rich Results Test</a> or <a href="https://validator.schema.org" rel="noopener">Schema.org Validator</a>. Paste your live URL, if there are errors, the validator will show exactly which fields are missing or malformed. Common issues: missing required fields, invalid date formats, broken image URLs, or schema applied to the wrong page type.
For Webflow sites, schema is especially important because Webflow doesn't auto-generate it the way some platforms do. However, Webflow’s flexibility allows you to manually or dynamically implement schema markup.
This is the simplest and most direct way to add schema markup in Webflow.
You can add schema markup in two primary areas:
<script type="application/ld+json">
{
  "@context": "https://schema.org",
  "@type": "Organization",
  "name": "The CSS Agency",
  "url": "https://www.thecssagency.com",
  "logo": "https://www.thecssagency.com/logo.png"
}
</script>
Add this script to the Page Settings > Before tag or via an Embed component.
This method is perfect for blogs, product listings, or team member profiles.
<script type="application/ld+json">
{
  "@context": "https://schema.org",
  "@type": "BlogPosting",
  "headline": "{{cms-title}}",
  "author": {
    "@type": "Person",
    "name": "{{cms-author}}"
  },
  "datePublished": "{{cms-date}}",
  "image": "{{cms-image}}"
}
</script>
Use dynamic CMS variables (bindings) to auto-generate schema per item.
If you’re not comfortable writing JSON-LD manually, you can use tools to generate your schema markup:
Once you generate the code, copy and paste it into your Webflow project using the custom code embed method.
Use one of the following tools:
Log into Webflow and select the specific page you want to apply schema to.
Example:
<script type="application/ld+json">
{
  "@context": "https://schema.org",
  "@type": "Product",
  "name": "Product Name",
  "brand": {
    "@type": "Brand",
    "name": "Brand Name"
  },
  "offers": {
    "@type": "Offer",
    "price": "0000",
    "priceCurrency": "USD",
    "availability": "https://schema.org/InStock"
  }
}
</script>
After publishing, test your page with:
Fix any errors to ensure your structured data is compliant.
Here are the schema types you should consider depending on your business type:
Adding schema markup to your Webflow website is one of the most impactful SEO upgrades you can make. It enhances how your pages appear in search results, boosts visibility, and drives more qualified traffic.
Whether you're using static schema via embed codes or leveraging dynamic JSON-LD with the Webflow CMS, structured data gives your website a technical advantage. Don’t forget to validate every schema script and keep it updated as your content evolves.
Yes, you can add schema markup in Webflow manually using the <head> or <body> embed code components, or via custom HTML in your page settings. Webflow doesn’t have a built-in schema editor, so you’ll need to create and insert the structured data yourself.
You can use free schema generators like Google's Structured Data Markup Helper or Schema.dev to create JSON-LD code. Once generated, paste it into your Webflow project using an Embed element or the page settings’ custom code section.
For most JSON-LD scripts, you can place them in the:
Always ensure it's within <script type="application/ld+json"> tags.
No. Webflow generates clean HTML but does not automatically add JSON-LD schema markup. You need to add it manually via Embed elements or Custom Code in Page Settings. Webflow does generate basic Open Graph meta tags automatically when you fill in SEO settings.
Use JSON-LD. Google explicitly recommends JSON-LD as the preferred format because it's cleaner, doesn't interfere with HTML structure, and is easier to maintain. Microdata is older and harder to debug. All schema types work in JSON-LD.
You don't need to write code from scratch. Use Google's Structured Data Markup Helper or schema generators like Merkle's Schema Markup Generator to produce ready-to-paste JSON-LD. Then paste it into a Webflow Embed element or the Custom Code section. No JavaScript skills required.


Sanket Vaghani has 8+ years of experience building designs and websites. He is passionate about building user centric designs and Webflow. He build amazing Webflow websites and designs for brands.
Find the possibilities of Webflow! Learn what you can build with Webflow, from simple portfolios to complex interactive applications.

In the competitive landscape of Software as a Service (SaaS), having an impactful online presence is crucial. This is where Webflow comes into the picture as a game-changer for SaaS companies.

Discover how Webflow for Startups offers an all-in-one website builder for startups, making website development for startups efficient and scalable.
Quick Turnaround. No Contracts. Cancel Anytime. Book a 30 minutes consulting call with our expert.