


AI in Modern Web Design: Tools, Benefits & Future Trends (2026)
Read how AI is changing modern web design in 2026. From AI design tools to personalization and automation, learn how designers and agencies are building smarter websites.

Actionable insights to improve SEO, speed, and conversions
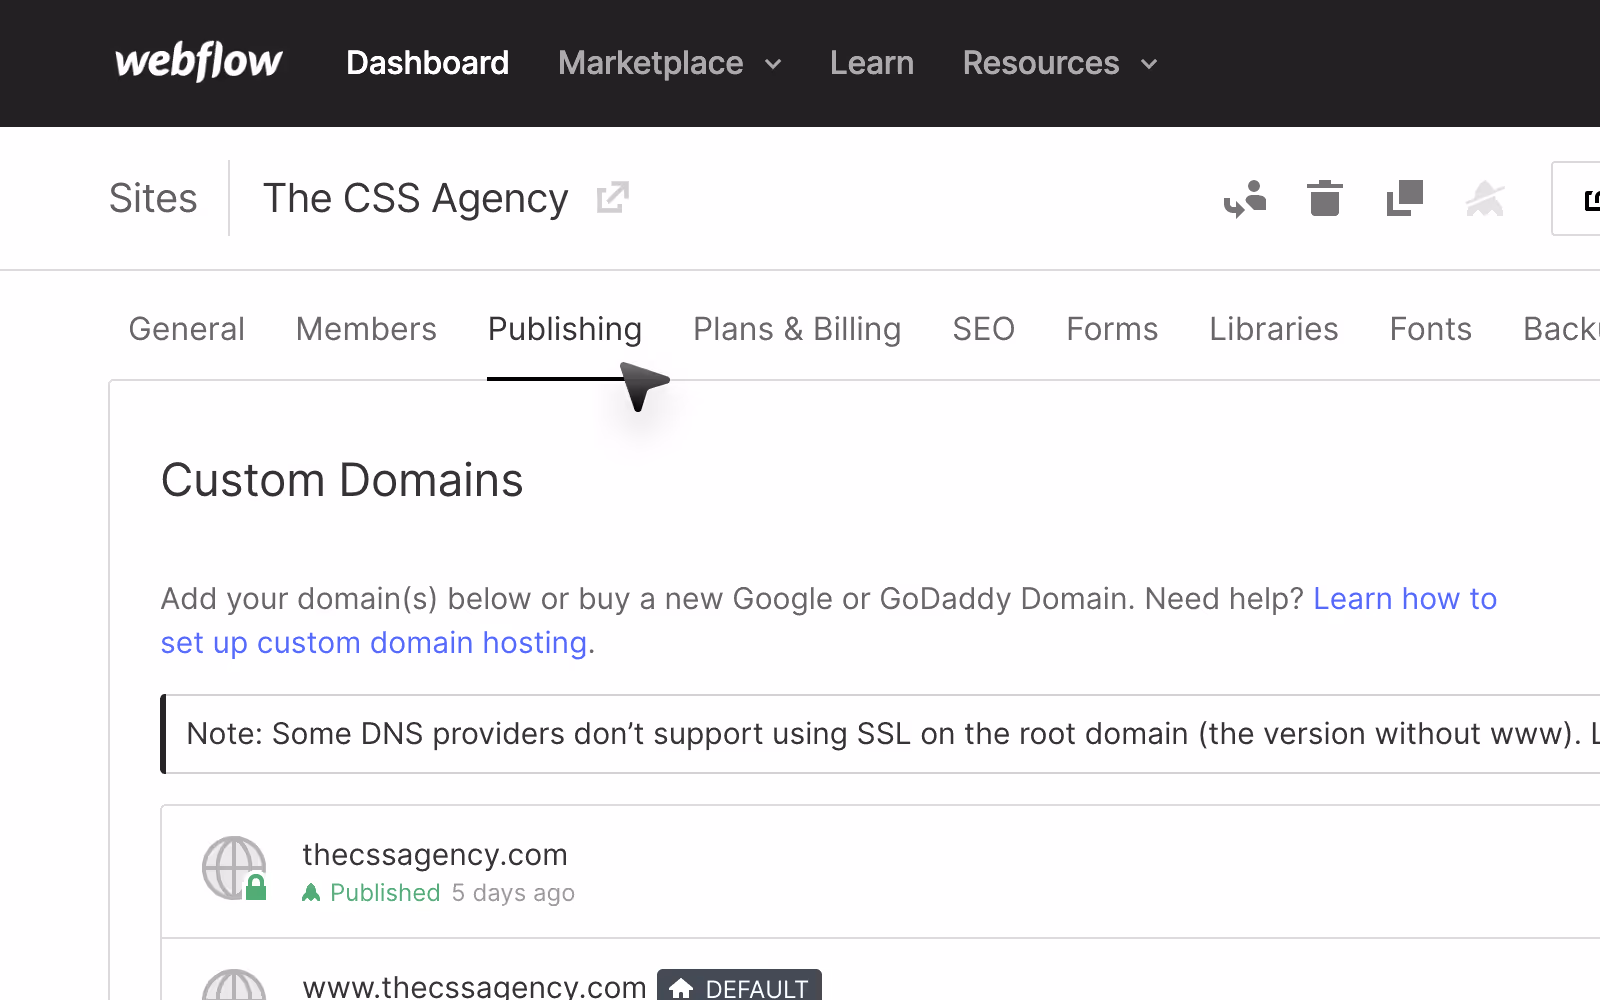
A 301 redirect is a permanent instruction that sends visitors and search engines from an old URL to a new one, passing roughly 90–99% of the original page's link equity. In Webflow, you add 301 redirects under Site Settings → Publishing → 301 Redirects, entering the old path and the new path, then publishing. Redirects require a paid Site plan.
A 301 redirect in Webflow is a permanent URL forwarding rule that sends visitors and search engines from an old URL to a new one. It preserves your SEO ranking, prevents 404 errors after URL changes, and is essential whenever you delete pages, change slugs, or migrate content. This guide covers manual 301 setup, automatic redirects, common mistakes, and how to verify they work
Webflow, as a no-code website builder, makes every part of website building and handling easy. If you’re new to Webflow, please read this Webflow Guide, and if you don’t know how to set up redirects, including Webflow 301 redirects, then this is the guide for you.
In the following guide, our certified Webflow developer shows you how to set up 301 redirects in Webflow. Also, help with how to maintain your SEO. And you'll keep your site running smoothly when you change URLs or restructure your site.
A 301 Redirect is a permanent redirect that automatically sends users and search engines from one URL to another. It tells Google and other search engines that the original page has moved permanently, and all its SEO value (rankings, backlinks, authority) should be transferred to the new URL.
There are multiple benefits of setting up Webflow 301 redirects for your website. Why would you need them? Redirects in Webflow play a key role in preserving SEO.
If you change your site’s structure, move pages, or update URLs, a 301 redirect guides visitors (and Google) to the new location.
That means you don’t lose any hard-earned SEO ranking or valuable backlinks. Redirects also prevent 404 errors that can hurt your traffic and your search rankings.
Setting up 301 redirects will mean that your website visitors will never land on a page that doesn’t exist. If you’re selling a product or service, pages not working could mean you end up losing potential customers.
Google knows the URL of every single page on your website. When you change the URL of a page, Google knows that the page isn’t available anymore. Any SERP ranking the page has will be removed eventually.
To avoid losing the valuable rankings you’ve earned especially if your content is featured on authoritative marketing sites for guest posting you must set up 301 redirects. A proper 301 redirect ensures that your page retains its authority, link equity, and overall ranking power
All in all, redirects, and particularly the implementation of a 'webflow 301 redirect,' can prevent you from losing search engine rankings and from having unhappy users.
Get Webflow SEO & AEO Service for your website.
A 301 is permanent and passes link equity to the new URL; a 302 is temporary and tells search engines to keep indexing the original. Use 301 for moved or merged pages, 302 only for short-term changes like A/B tests or seasonal pages you'll revert.
301 redirects are useful in many situations when managing a website.
If you update a page slug, a redirect ensures visitors from the old URL land on the new page.
Example:
/webflow-tutorial → /webflow-guideIf you remove a page, redirect the old URL to a related page to avoid 404 errors.
When moving a website from another platform to Webflow, redirects help preserve existing SEO rankings.
If you combine multiple blog posts into one, redirect the old URLs to the updated article.
Using proper redirects ensures users and search engines always find the correct content.
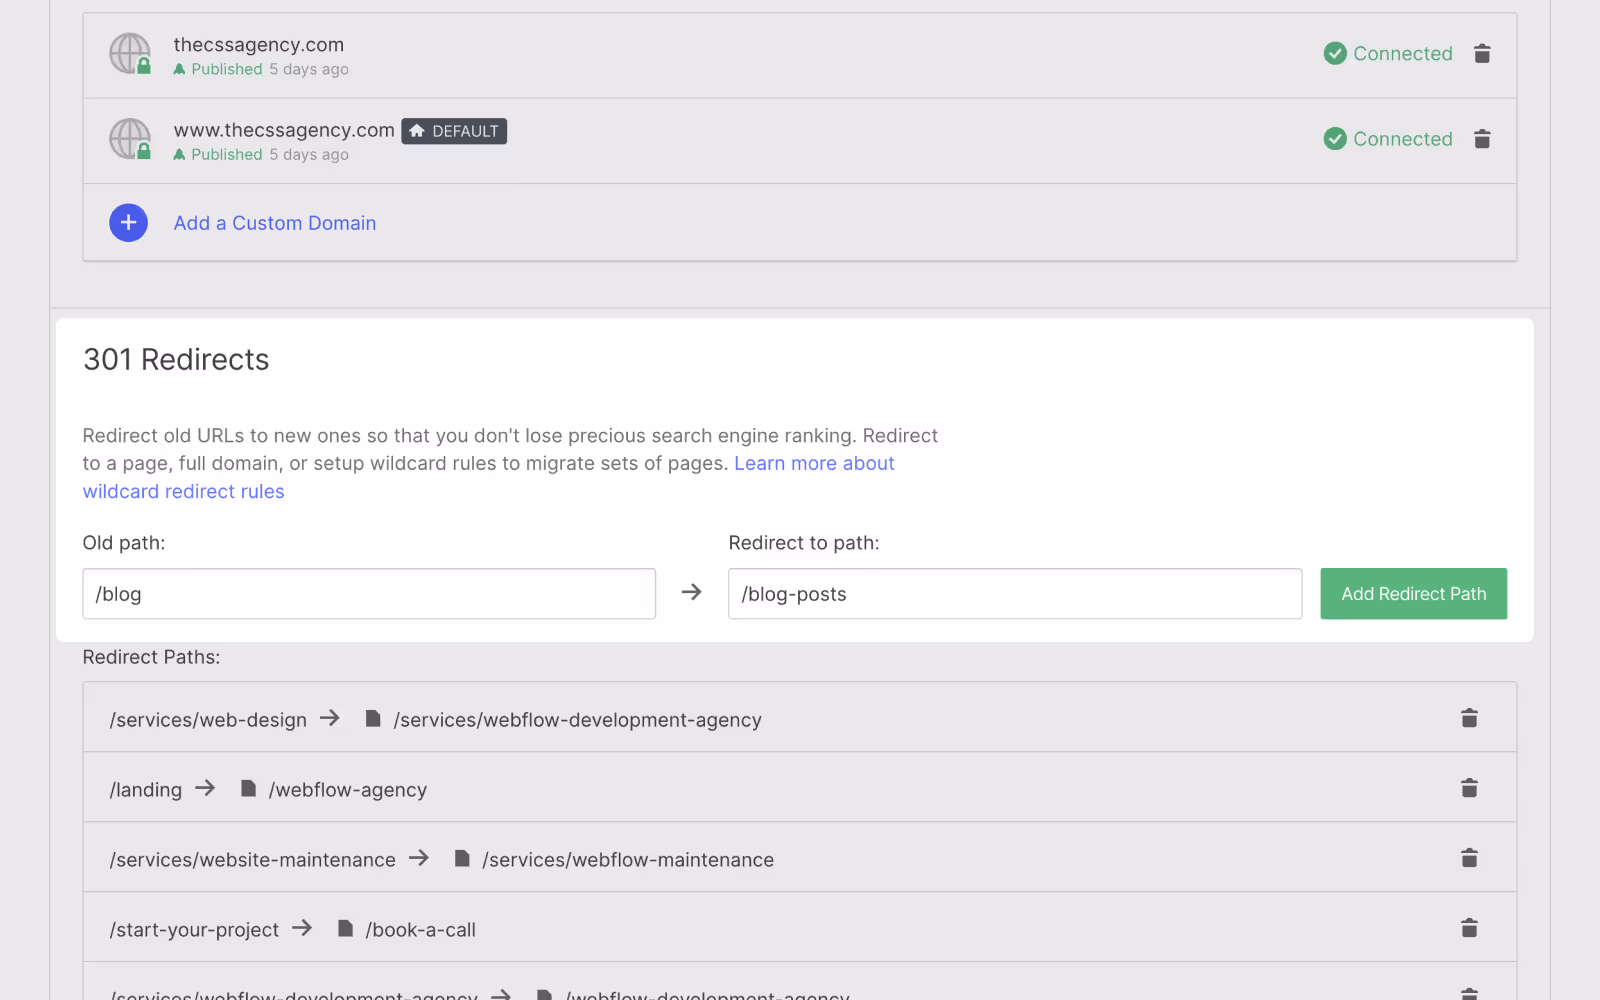
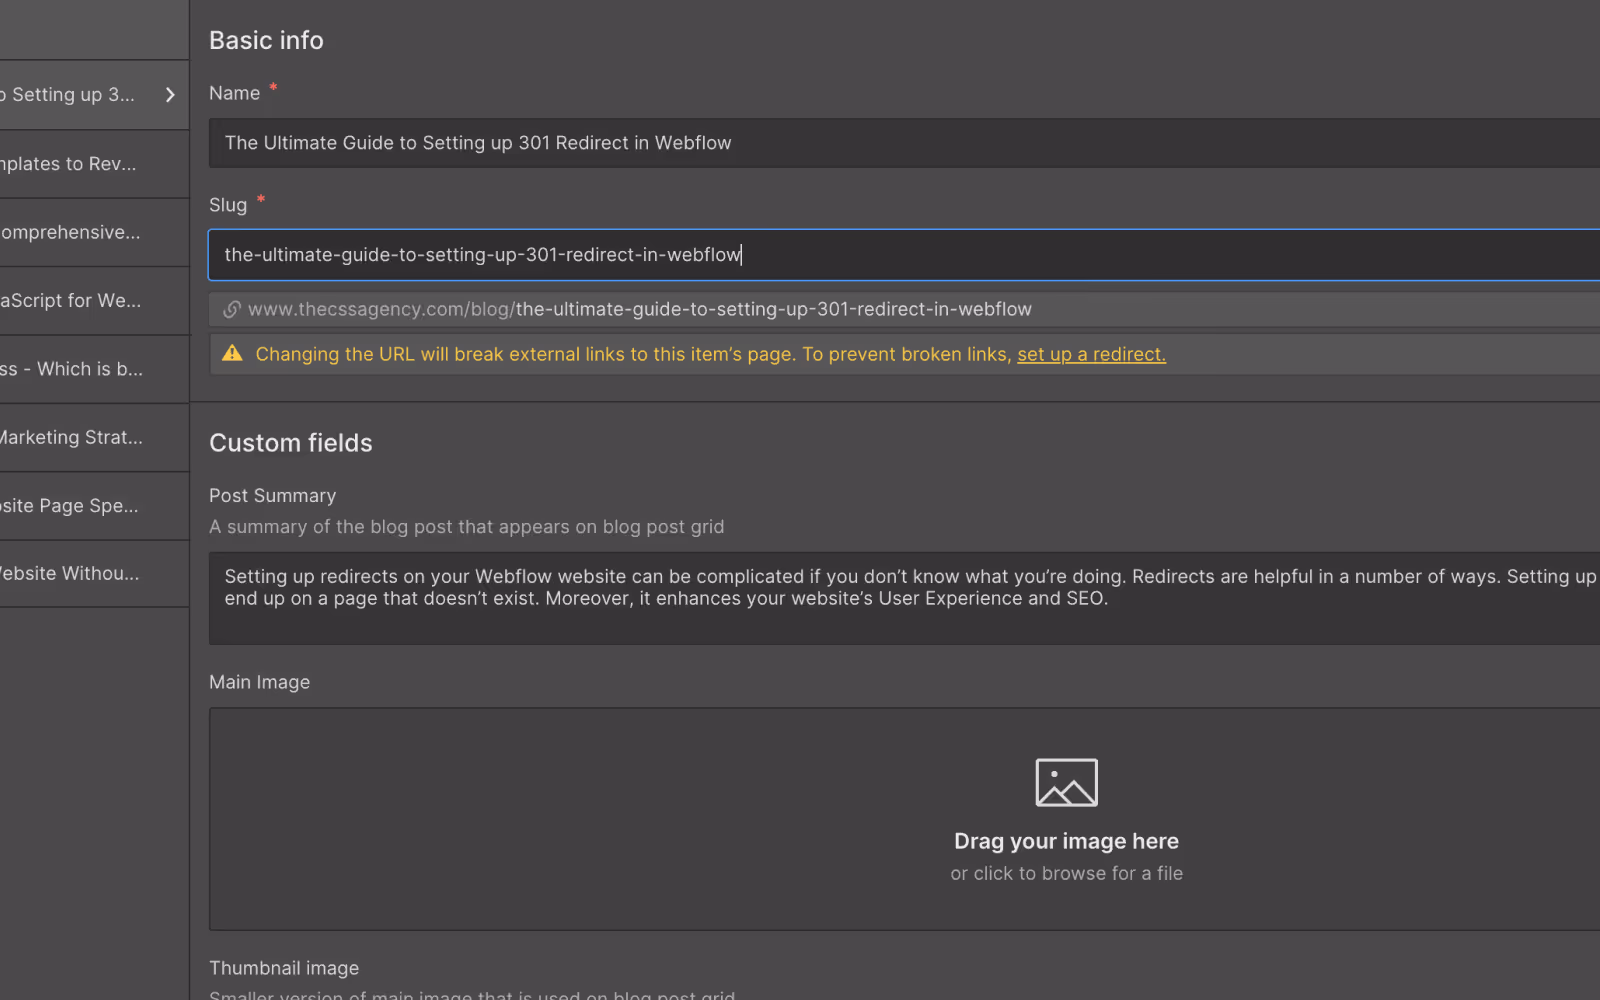
In Webflow, go to Site Settings → Publishing → 301 Redirects. In "Old Path" enter the path only (e.g. `/old-page`), in "Redirect to Page" enter the new path (e.g. `/new-page`), click Add, and publish the site. The redirect is live the moment publishing finishes
Webflow makes everything pretty easy for website owners. This also applies when you try to set up Webflow redirects. Here’s the step-by-step process:

Here’s another way to set up 301 webflow redirects. If you don’t want to do too much work manually, you can take advantage of automatic redirections in Webflow.
Webflow redirects are used when moving content to a new URL, deleting pages, changing domain names, or merging websites. To check whether your redirects are working or not, you can try this method.
Example:
curl -I https://example.com/old-page
Expected response:
301 Moved PermanentlyA wildcard redirect forwards every URL that matches a pattern to a matching new URL so you can move an entire folder with one rule instead of adding hundreds of redirects by hand. Webflow supports two wildcard styles, and you can use whichever fits the move. Both live in Site settings → Publishing → 301 redirects.
Use an asterisk (*) at the end of the old path to catch everything beneath a folder, and an asterisk in the destination to drop it back in:
Old path:/old-blog/*
Redirect to:/blog/*
Webflow forwards /old-blog/webflow-seo to /blog/webflow-seo, /old-blog/pricing to /blog/pricing, and so on. The asterisk captures everything after its position and re-inserts it at the asterisk in the destination.
For finer control, use a regex-style capture group (.*) in the old path and a back-reference %1 in the destination:
Old path: /old-folder/(.*)
Redirect to: /new-folder/%1
Whatever (.*) matches is reused wherever you place %1. You can use more than one capture group a second (.*) becomes %2, a third becomes %3, and so on. This lets you rearrange URL segments, not just move a folder. For example, /(.*)/blog/(.*) → /blog/%1/%2 reorders the path.
A capture group (.*) matches a single path segment it stops at the next forward slash (/). So /old-folder/(.*) matches /old-folder/post-one but not /old-folder/2026/post-one (that has an extra /). To catch nested paths, add a capture group for each segment, or use the asterisk form (/old-folder/*), which catches the full remaining path including extra slashes.
Common wildcard use cases
/old-blog/* to /blog/*/services/(.*) → /solutions/%1Always <strong>publish your site</strong> after adding a wildcard redirects don't activate until the next publish. If you have a lot of folder moves to map at once, the fastest route isn't adding them one by one it's importing them as a CSV (next section).
Webflow now lets you manage 301 redirects in bulk with a CSV file import a whole list at once, or export your existing redirects to edit them in a spreadsheet. This is the fastest way to handle a migration, where you might be mapping dozens or hundreds of old URLs to new ones. You'll find it in Site settings → Publishing → 301 redirects (available on paid Site plans).
The file is two columns, one row per redirect:
In the same panel, click Export CSV to download every redirect currently on your site. Handy for backups, audits, or handing a list to a developer.
This is the one thing that catches people out. Importing a CSV overwrites all existing redirects on your site it doesn't add to them. If you already have redirects live and you import a new file, the old ones are wiped. The safe workflow:
That way you keep everything and add the new ones in a single, clean import.
Webflow's redirect engine accepts three syntax patterns in the Old Path and Redirect to Page fields. Understanding which to use prevents the most common redirect errors.
Rules to remember:
http:// or your domain./About and /about are treated as different URLs?utm_source=…) are preserved through the redirect by default/page and /page are treated as the same URLIf you need to redirect with conditional logic (by country, device, or referrer), Webflow's built-in redirects don't support that — you'll need a Cloudflare Workers script in front of your Webflow site.
Outside Webflow, the method depends on the stack. On Apache, add `Redirect 301 /old-page https://site.com/new-page` to `.htaccess`. On NGINX, use `return 301 https://site.com/new-page;` in the server block. On WordPress, a plugin like Redirection handles it without code. The SEO effect is identical: a permanent redirect that passes link equity.
The 301 redirect setup process changes based on what's hosting your site. The principle is the same tell the server "this old URL permanently moved to this new URL" but the syntax varies. Here's how to set up 301 redirects on the major platforms beyond Webflow.
WordPress has three common 301 redirect methods, ranked easiest to most technical:
Most Webflow redirect problems trace to three things: a redirect loop from conflicting www/non-www or SSL settings, a rule that’s too broad, or a CMS slug change that left the old URL with no rule. Here are the exact errors and the fix for each.
“ERR_TOO_MANY_REDIRECTS” / “redirected you too many times.” This is a loop. In Webflow it’s almost always the www vs. non-www setting fighting your redirect rules, or an external proxy (like Cloudflare) set to “Flexible” SSL while Webflow forces HTTPS. Fix it by choosing one canonical domain in Project Settings → Publishing, setting Cloudflare SSL to “Full,” and removing any manual rule that points a URL back at itself.
Redirect not firing at all. Webflow only applies redirects on the published site, never in the Designer preview, and only after you publish. Check that the path has no leading domain use /old-page, not the full URL and that a live page isn’t already sitting on that slug. A real page always wins over a redirect.
Redirecting after a CMS slug change. When you rename a CMS item, the old URL starts returning a 404, and Webflow doesn’t create the rule for you. Add a 301 from /collection/old-slug to the new one. If you’re changing slugs in bulk, our Webflow 301 Redirect Generator builds the rules for you so you’re not doing it by hand.
Wildcard redirects (a whole folder at once). Use path matching like /old-blog/(.*) → /blog/(.*) to move an entire folder to a new structure in one rule instead of hundreds. This is the clean way to handle a Webflow migration or a URL restructure.
404 and form redirects. A 404 redirect sends dead URLs to a useful page set your 404 page in Project Settings, and add proper 301s for any dead URL that still has backlinks so you don’t waste that link equity. A form redirect (sending users to a thank-you page after submit) is set on the form’s own settings, not the redirects table a common mix-up. Once your redirects are live, resubmit your sitemap so Google recrawls faster.
This concludes our guide on how to set up 301 redirects in Webflow, including the implementation of a 'Webflow Redirect Page Or Redirect URL.' You can either set up redirects manually, or you can rely on the Webflow automatic redirection feature.
So, the next time you’re changing your URL and don’t want to lose rankings, we suggest you carefully set up redirects. In most cases, your pages will be automatically redirected, in case they aren’t, you can follow the steps mentioned above.
Also, make sure to always test your URLs after you implement redirects.
A 301 redirect is a permanent redirect that forwards users and search engines from one URL to another. It is crucial to maintain SEO equity when URLs change or pages are moved.
To redirect any URL in Webflow, you need to add a 301 redirect path under Site Settings → Publishing. The "Old Path" is the URL you want to redirect from (must start with /), and the "Redirect to Page" is where users will land. Both can be relative paths (/old-page → /new-page) or external URLs.For redirecting an entire URL pattern (e.g., all /old-blog/* URLs), you can use wildcard redirects on Webflow CMS plans and above. Webflow processes redirects before page rendering, so they're fast and don't add server-side delay.
Yes, 301 redirects help preserve SEO value by passing most of the ranking signals from the old URL to the new one.
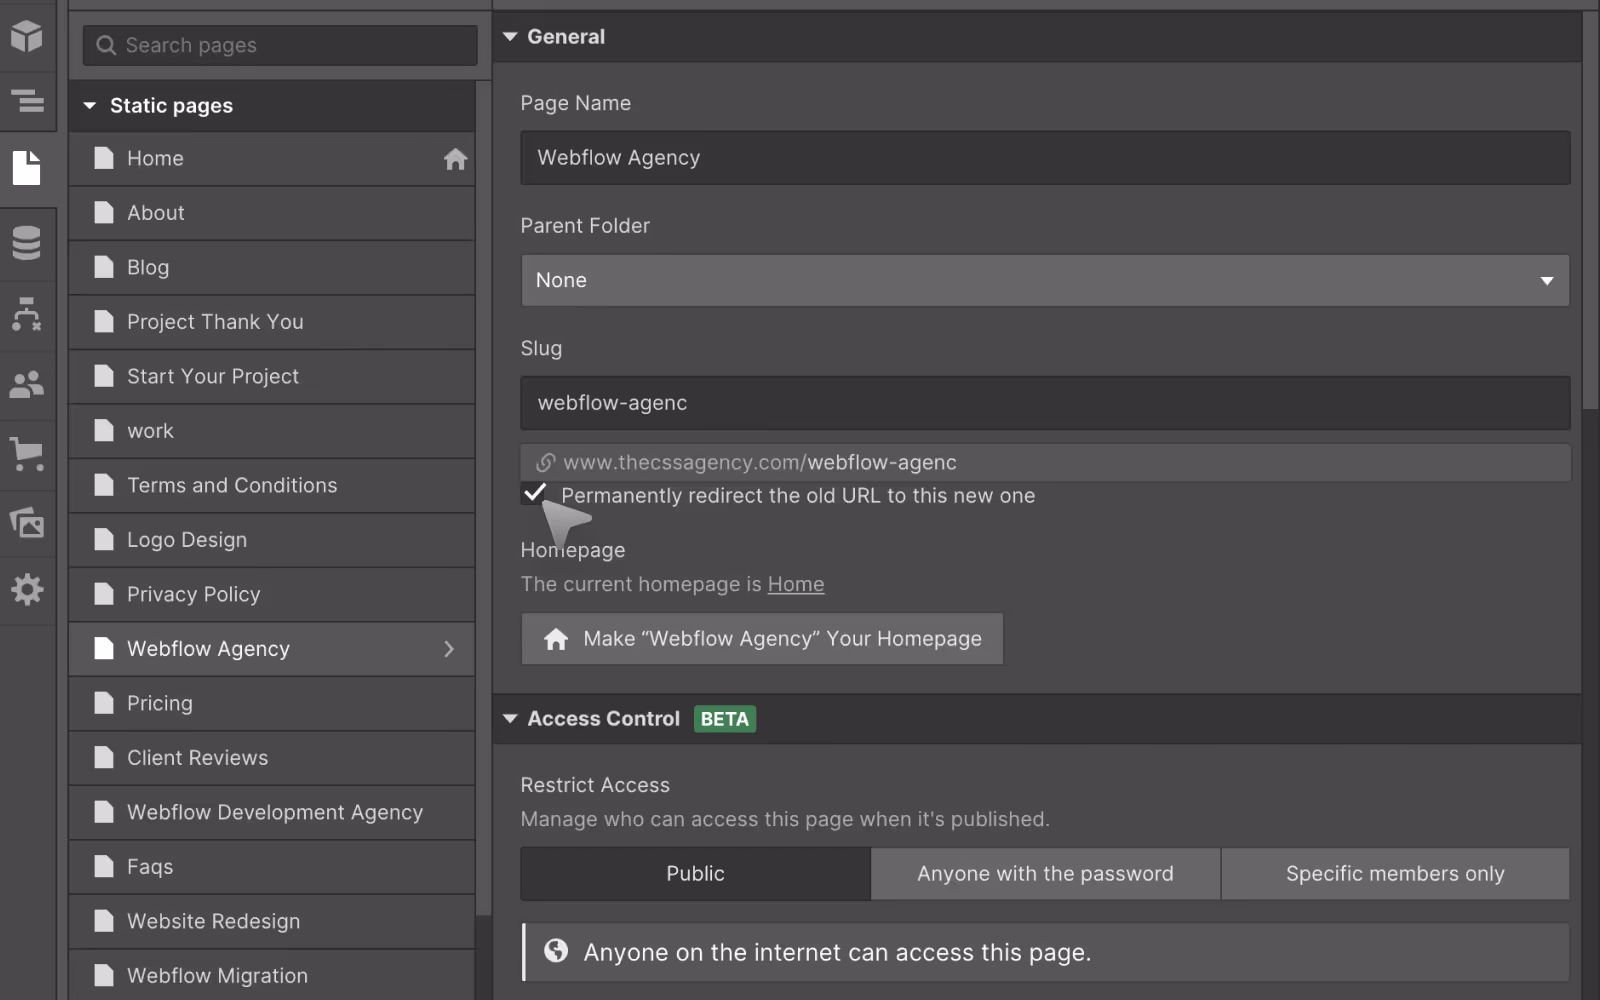
Webflow can automatically suggest redirects when you change a page slug, but it’s recommended to manually verify the redirect in Site Settings → Publishing → 301 Redirects.
Webflow 301 redirects activate within seconds of publishing your site. Search engines may take days to weeks to fully recognize the redirect and transfer ranking signals to the new URL.
Yes. On any paid Site plan, go to Site settings → Publishing → 301 redirects and use Import CSV. The file needs two columns Old path and Redirect to path with one row per redirect. You can also Export CSV to back up or edit your existing redirects. Important: importing a CSV replaces all existing redirects on your site, so export what you have first, add your new rows to that file, then re-import. Publish your site for the redirects to take effect.
Yes. The "Redirect to Page" field accepts both internal paths (/new-page) and full external URLs (https://example.com/page). External redirects still pass SEO equity to the destination domain.
Webflow only supports 301 (permanent) redirects natively. A 301 tells search engines the move is permanent and transfers SEO ranking signals to the new URL. If you need a 302 (temporary) redirect for A/B testing or seasonal content, you'll need a Cloudflare Worker or third-party service in front of your Webflow site.
Yes. Use the full collection item path in the Old Path field for example, <code>/blog/old-post-slug</code>. If you've changed the slug of a CMS item, Webflow doesn't auto-create the redirect, so you must add it manually under Site Settings → Publishing → 301 Redirects.
Webflow allows up to 10,000 redirects per site on standard plans. For sites with more than 10,000 needed redirects (typically after a large migration), use wildcard patterns to consolidate, or contact Webflow Enterprise.
Both forward a group of URLs in one rule. The asterisk form (/old-blog/* → /blog/*) catches the entire remaining path, including nested folders. The capture-group form (/old-folder/(.*) → /new-folder/%1) matches a single path segment and stops at the next slash, but lets you reuse and rearrange segments with %1, %2, and so on. Use the asterisk for a straight folder move; use capture groups when you need to restructure the path.
Yes a CSV import overwrites all existing 301 redirects on your site rather than adding to them. To avoid losing anything, export your current redirects to CSV first, add the new rows to that same file, then import the combined file and publish.


Viken Patel has 17+ years of experience working with websites. He is passionate about building website that converts. His marketing background helps him build the sales driven websites.
.avif)
Read how AI is changing modern web design in 2026. From AI design tools to personalization and automation, learn how designers and agencies are building smarter websites.

Connect your Webflow forms to Mailchimp three ways: natively, via Zapier, and embed with step-by-step setup, field mapping, and fixes for subscribers not syncing.
Figma designs, Webflow publishes, but Figma Sites blurs the line. Here's Webflow vs Figma and Figma Sites compared, plus how the Figma-to-Webflow workflow fits.
Quick Turnaround. No Contracts. Cancel Anytime. Book a 30 minutes consulting call with our expert.