
Losing work on your website is stressful. One wrong change can break a page or delete content. The good news is that Webflow keeps backups for you, so you can roll back. This guide explains how Webflow backups work, and how to back up and restore your site, a page, or CMS items. You will also learn the limits, so you never lose important work.
We build and maintain Webflow sites for clients at theCSS Agency. These are the exact backup steps and safeguards our team uses.
Does Webflow Back Up Your Site Automatically?
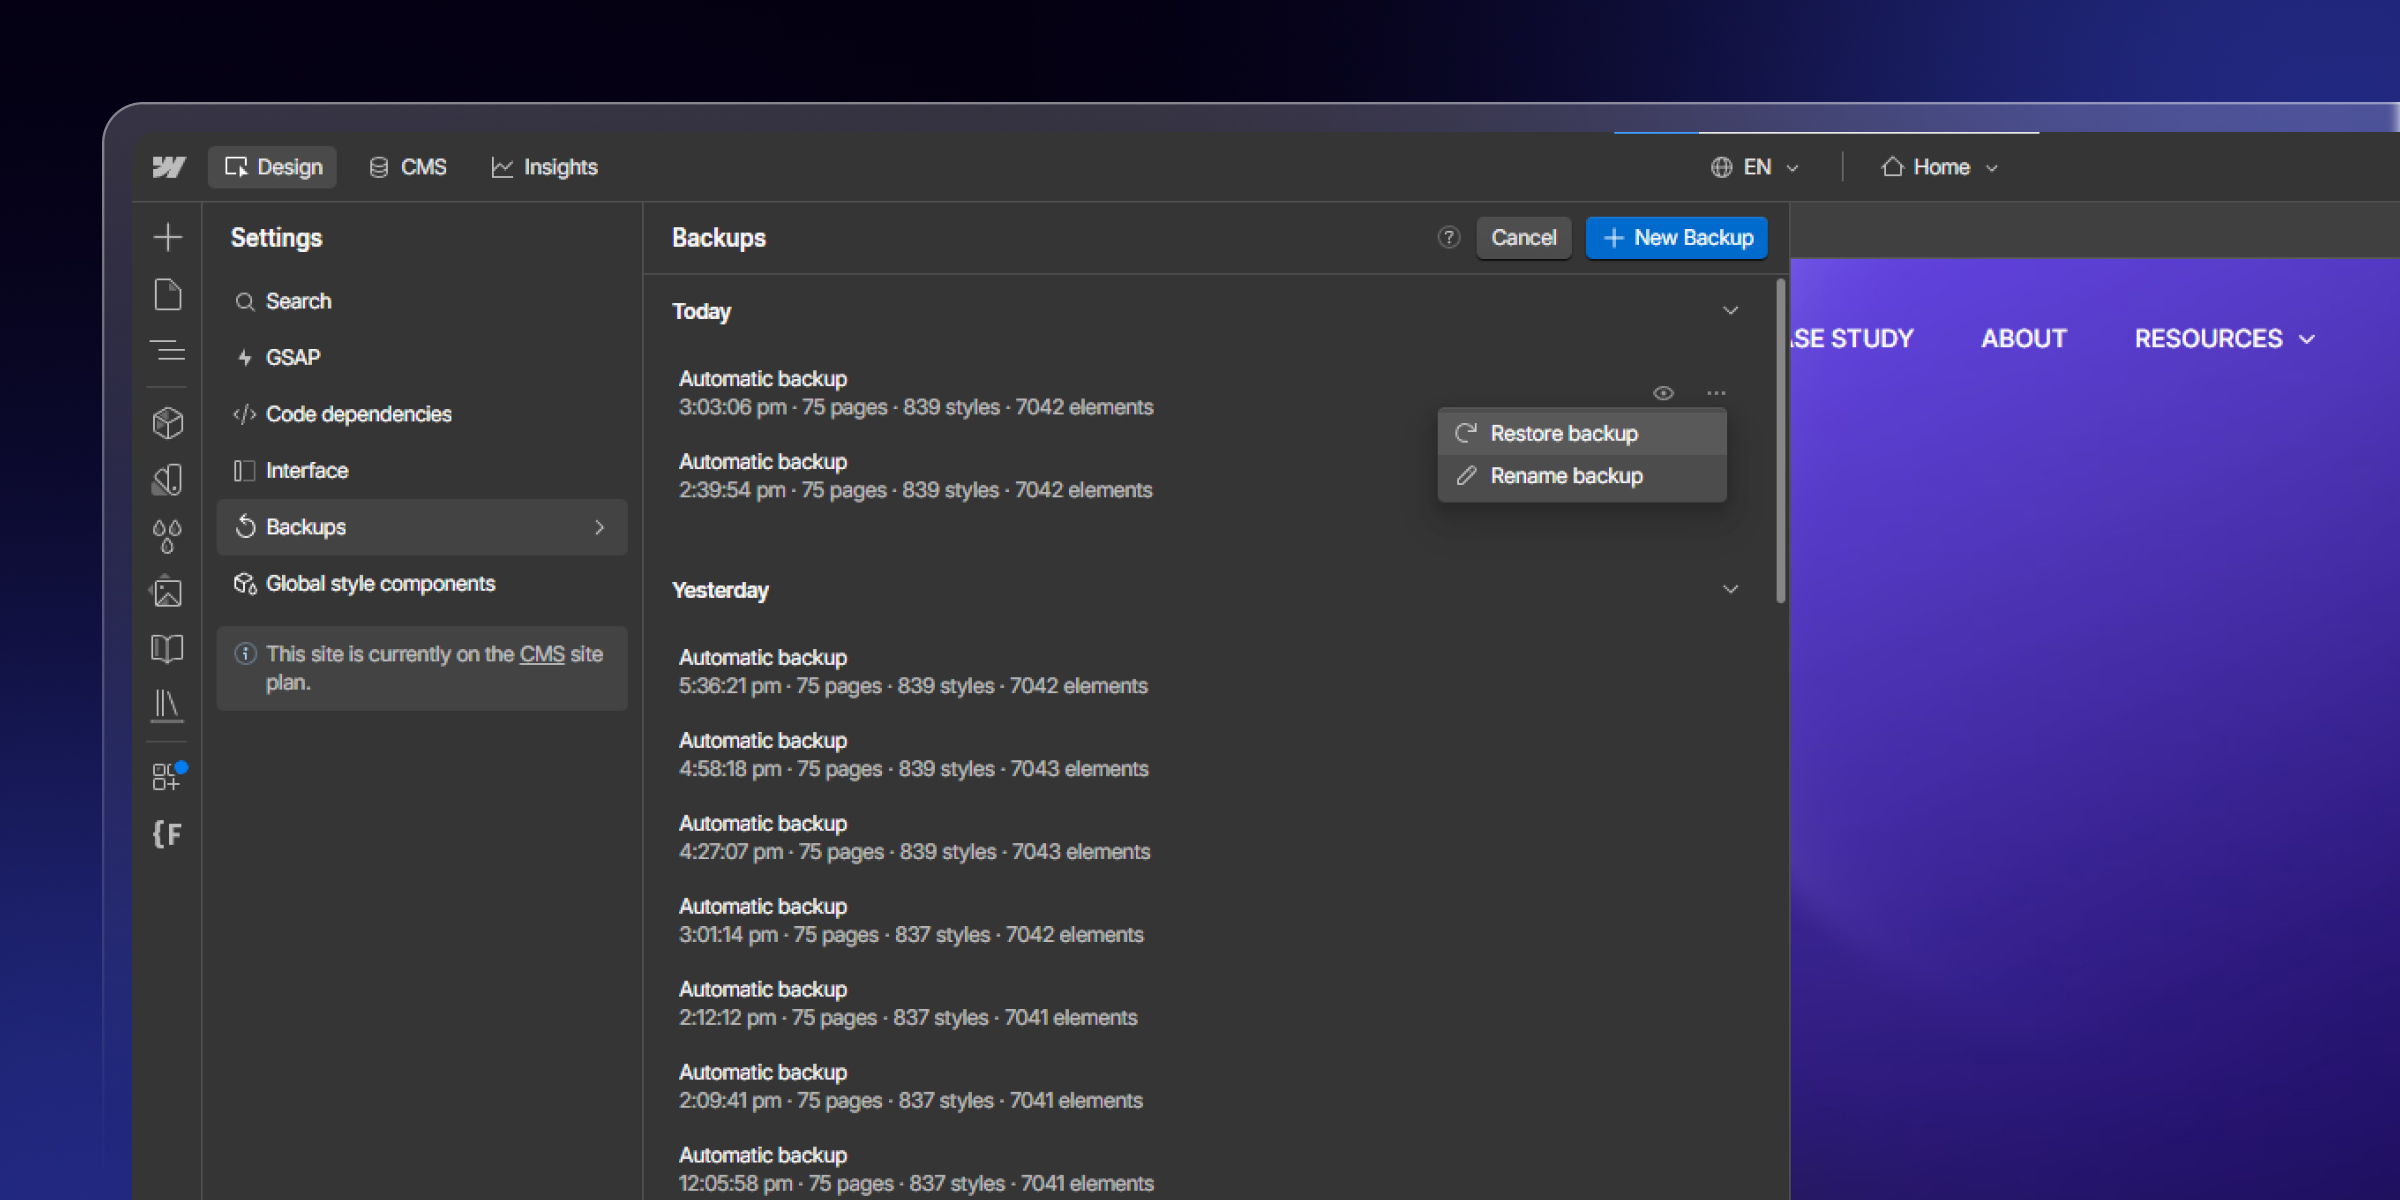
Yes. Webflow saves automatic backups of your project as you work. Each time you make big changes and leave the Designer, Webflow stores a version. So you always have recent points to return to.
These automatic backups act like a webflow version history. You can see a list of them by date and time. If something breaks, you can roll back to a point before the problem. Free plans keep a limited number of backups, while paid plans keep unlimited ones.
How Webflow Backups Work
A Webflow backup is a snapshot of your entire project at a point in time. It captures your pages, design, structure, and settings. When you restore one, your whole site returns to that snapshot.
There are two kinds of backups to know. Automatic backups are saved by Webflow for you. Manual backups are ones you create by hand before a risky change. Together, they give you a strong webflow backup and restore system. Below, we cover how to use each one.
How to Back Up a Webflow Site
You have three ways to protect your whole site. Use all three for the safest setup.
Automatic Backups
Webflow creates automatic backups as you work. You do not need to turn this on, since it runs by default. Each backup is stamped with a date and time.
To view them, open Site Settings and click the Backups tab. You will see a list of past versions in order, each with a date and time. This gives you a running history with no effort on your part.
Create a Manual Backup
Before any big change, create a manual backup yourself. This gives you a clean point to return to if the change goes wrong. It is the smartest habit for any Webflow project.
Here are the steps to create one.
- Open Site Settings, then the Backups tab.
- Confirm your changes are saved first.
- Choose the option to create a backup.
- Give it a clear name, like "Before homepage redesign."
You can also make a quick backup with a shortcut. Press Command plus Shift plus S on Mac, or Control plus Shift plus S on Windows. A named backup is easy to find later, so you can restore the right one fast.
Export Your Site as an Extra Backup
For extra safety, export a copy of your site. Webflow lets you export your site code as a ZIP file on paid plans. This gives you an offline copy of your design and structure.
Keep this export in your own storage, like a drive or a cloud folder. It is a strong backup for a backup webflow site plan. Note that an export does not include your CMS content, which we cover below.
How to Restore a Webflow Site
If a change breaks your site, a restore brings it back. The webflow restore process is quick and safe.
Restore From the Backups Panel
To roll your site back, follow these steps.
- Open Site Settings, then the Backups tab.
- Find the version you want by its date or name.
- Preview that version to confirm it is the right one.
- Click restore, then confirm when Webflow asks.
- Publish your site to push the restored version live.
Your Designer then returns to that exact snapshot. Do not skip the last step. A restore updates the Designer, but the live site changes only after you publish. This is the core of any restore webflow site task.
What Happens When You Restore
A restore is safer than it sounds. Before it rolls back, Webflow saves a backup of your current state. So if you restore the wrong version, you can undo it.
Keep in mind that a restore affects the whole site. It rolls back every page, not just one. The restore updates your Designer, so publish the site to make it live. Use a restore when a broad change went wrong, not for a small page fix.
What to Check After a Restore
A restore can reset a few settings, so review these after. Scheduled CMS items may switch back to a draft or queued state. Your reCAPTCHA keys may need to be added again in your integrations. Spam and bot protection can turn off during a restore.
Take five minutes to check these once the restore is done. A quick review keeps your forms, content, and spam guards working. Then publish the site so the restored version goes live.
How to Back Up and Restore a Page
Webflow backups work at the site level, not the page level. So there is no button to restore one page on its own. But you can protect a single page with a simple trick.
Duplicate a Page as a Backup
Before you edit a page heavily, duplicate it first. Right-click the page in the Pages panel to duplicate the page. This makes a copy you can keep as a safe version.
Name the copy clearly, like "Home backup." Set it to not show in search, so it stays private. Now you have a page-level backup, even though Webflow has no page restore.
Read More: How to Make a Duplicate Page in Webflow
Restore a Single Page
To restore one page, you have two clean options. First, you can copy the sections from your duplicate page back into the live page. This fixes one page without touching the rest of the site.
The second option is a full site restore, but that rolls back everything. So the duplicate method is better for a single restore webflow page need. Plan ahead and duplicate before big edits.
How to Back Up and Restore CMS Items
CMS content needs its own backup plan. A site restore can revert CMS structure, but it is risky for content. The safe method is to export your collections to CSV.
Export a CMS Collection to CSV
Open your CMS and select a collection, like Blog Posts. Use the export option to download the items as a CSV file. This file holds all your item data in one place.
Do this on a regular schedule, like once a week. Store each CSV in your own folder with the date. This gives you a reliable webflow cms backup outside of Webflow.
Restore CMS Items From a CSV
To restore CMS content, import your CSV back into the collection. Webflow lets you map the CSV columns to your fields. You can add new items or update existing ones during the import.
Check the import preview before you confirm it. Make sure each column maps to the right field. Then run the import to bring your content back.
A Warning About Deleted CMS Items
Be careful when you delete CMS items. Webflow has no simple recycle bin for a single deleted item. Once you confirm a delete, that item is gone from the live collection.
A full site restore might bring it back, but it reverts everything else too. So the safest guard is a recent CSV export. With regular exports, you can always re-import lost items.
Read More: Webflow CMS Guide
Limits of Webflow Backups
Webflow backups are strong, but they have limits. Know these before you rely on them.
- Plan limits: free plans keep fewer backups, while paid plans keep unlimited ones.
- Site-wide only: a restore rolls back the whole site, not one page.
- CMS caution: backups are not the best tool for restoring single CMS items.
- Settings can reset: a restore may revert scheduled items and reCAPTCHA keys.
- Exports skip CMS: a code export does not include your CMS content.
- Not account cover: backups do not protect against lost account access or billing issues.
Knowing these limits helps you build a backup plan that fills the gaps.
Webflow Backup Best Practices
Use these habits to keep your work safe.
- Create a named manual backup before every big change.
- Export your CMS collections to CSV on a weekly schedule.
- Keep an offline code export in your own storage.
- Name each backup clearly, so you can find the right one fast.
- Duplicate a page before you edit it heavily.
- Test the restored site after any rollback.
- Consider a third-party backup tool for automatic, external backups.
A few small habits protect you from a big loss.
Troubleshooting
A few questions come up often. Here are quick answers.
- I cannot find the Backups panel. Open Site Settings, then click the Backups tab.
- My restore rolled back too much. Restore the auto-backup Webflow made just before, to undo it.
- A CMS item is gone. Re-import your latest CSV export to bring it back.
- The export has no blog posts. Code exports skip CMS content, so export collections to CSV instead.
- I want to restore just one page. Copy the sections from your duplicate page, since Webflow has no page-only restore.
- My restored site is not live yet. A restore updates the Designer only. Publish the site to push the restored version live.
Conclusion
Webflow backups give you a strong safety net for your site. Automatic backups save versions as you work, and manual backups let you mark safe points. A restore rolls back your whole site, so duplicate a page before big edits. For CMS content, export your collections to CSV on a schedule.
Build a simple routine around these tools. Make a manual backup before big changes, and export your CMS each week. With these habits, you can fix any mistake and never lose important work.
Want a team to handle backups and upkeep for you? theCSS Agency offers Webflow maintenance and support for SaaS and B2B teams. Book a call to keep your site safe and healthy.
FAQs
1. Does Webflow back up your site automatically?
Yes. Webflow saves automatic backups of your project as you work. You can view them in the Backups panel and roll back to any version.
2. How do I restore a Webflow site?
Open the Backups panel in the Designer, find the version by date or name, and click restore. Your whole site then returns to that snapshot.
3. Can I restore a single page in Webflow?
Not directly. Webflow backups work at the site level. To protect one page, duplicate it first, then copy sections back from the duplicate when needed.
4. How do I back up Webflow CMS content?
Export each CMS collection to a CSV file on a regular schedule. To restore, import the CSV back into the collection and map the columns to your fields.
5. What happens when I restore a Webflow backup?
Webflow first saves a backup of your current state, then rolls the site back to the version you chose. So you can undo a restore if needed.
6. Do I need to publish after restoring a Webflow backup?
Yes. A restore updates your Designer to the chosen version. The live site changes only after you publish, so publish right after you restore.
7. Can I recover a deleted CMS item in Webflow?
There is no simple recycle bin for one item. A full site restore may bring it back but reverts everything else. A recent CSV export is the safest fix.
8. Does a Webflow code export include CMS content?
No. A code export includes your design and structure, but not your CMS content. Export your collections to CSV to back up CMS data.

.jpg)