


Webflow Interactions and Animations: Complete Guide (2026)
How Webflow Interactions work: trigger types (scroll, hover, click, page load), step-by-step setup, common use cases, GSAP integration, and troubleshooting when interactions don't fire.
Actionable insights to improve SEO, speed, and conversions
A well-designed language switcher improves user experience on multilingual websites and can increase conversion rates by up to 40% by allowing visitors to access content in their preferred language. For Webflow developers, implementing an intuitive language selector is essential for creating professional multilingual sites that serve global audiences effectively.
Language switchers enable seamless navigation between language versions without disrupting the user's browsing experience. When properly implemented, visitors stay on the same page while content switches to their selected language-maintaining context and improving engagement across all locales.
This comprehensive guide covers three proven implementation methods specifically for Webflow developers: using the native Locales List element, custom JavaScript toggles, and third-party integration solutions.
Whether you're building your first multilingual Webflow site or optimizing an existing implementation, this guide provides clear, actionable instructions that work in real-world development scenarios.
A language switcher is a navigation element that allows users to select their preferred language version of a website. It appears as a dropdown menu, button group, or inline links-typically in the header navigation or footer.
Language switchers help to reduce bounce rates from international visitors and improve engagement through native-language content delivery. Users can switch languages without losing their current page position.
Properly implemented language switchers work with hreflang tags to signal language alternatives to search engines, improving international rankings and organic traffic from target markets.
Common placement:
Sticky positioning: Remains visible during scrolling, optimal accessibility.
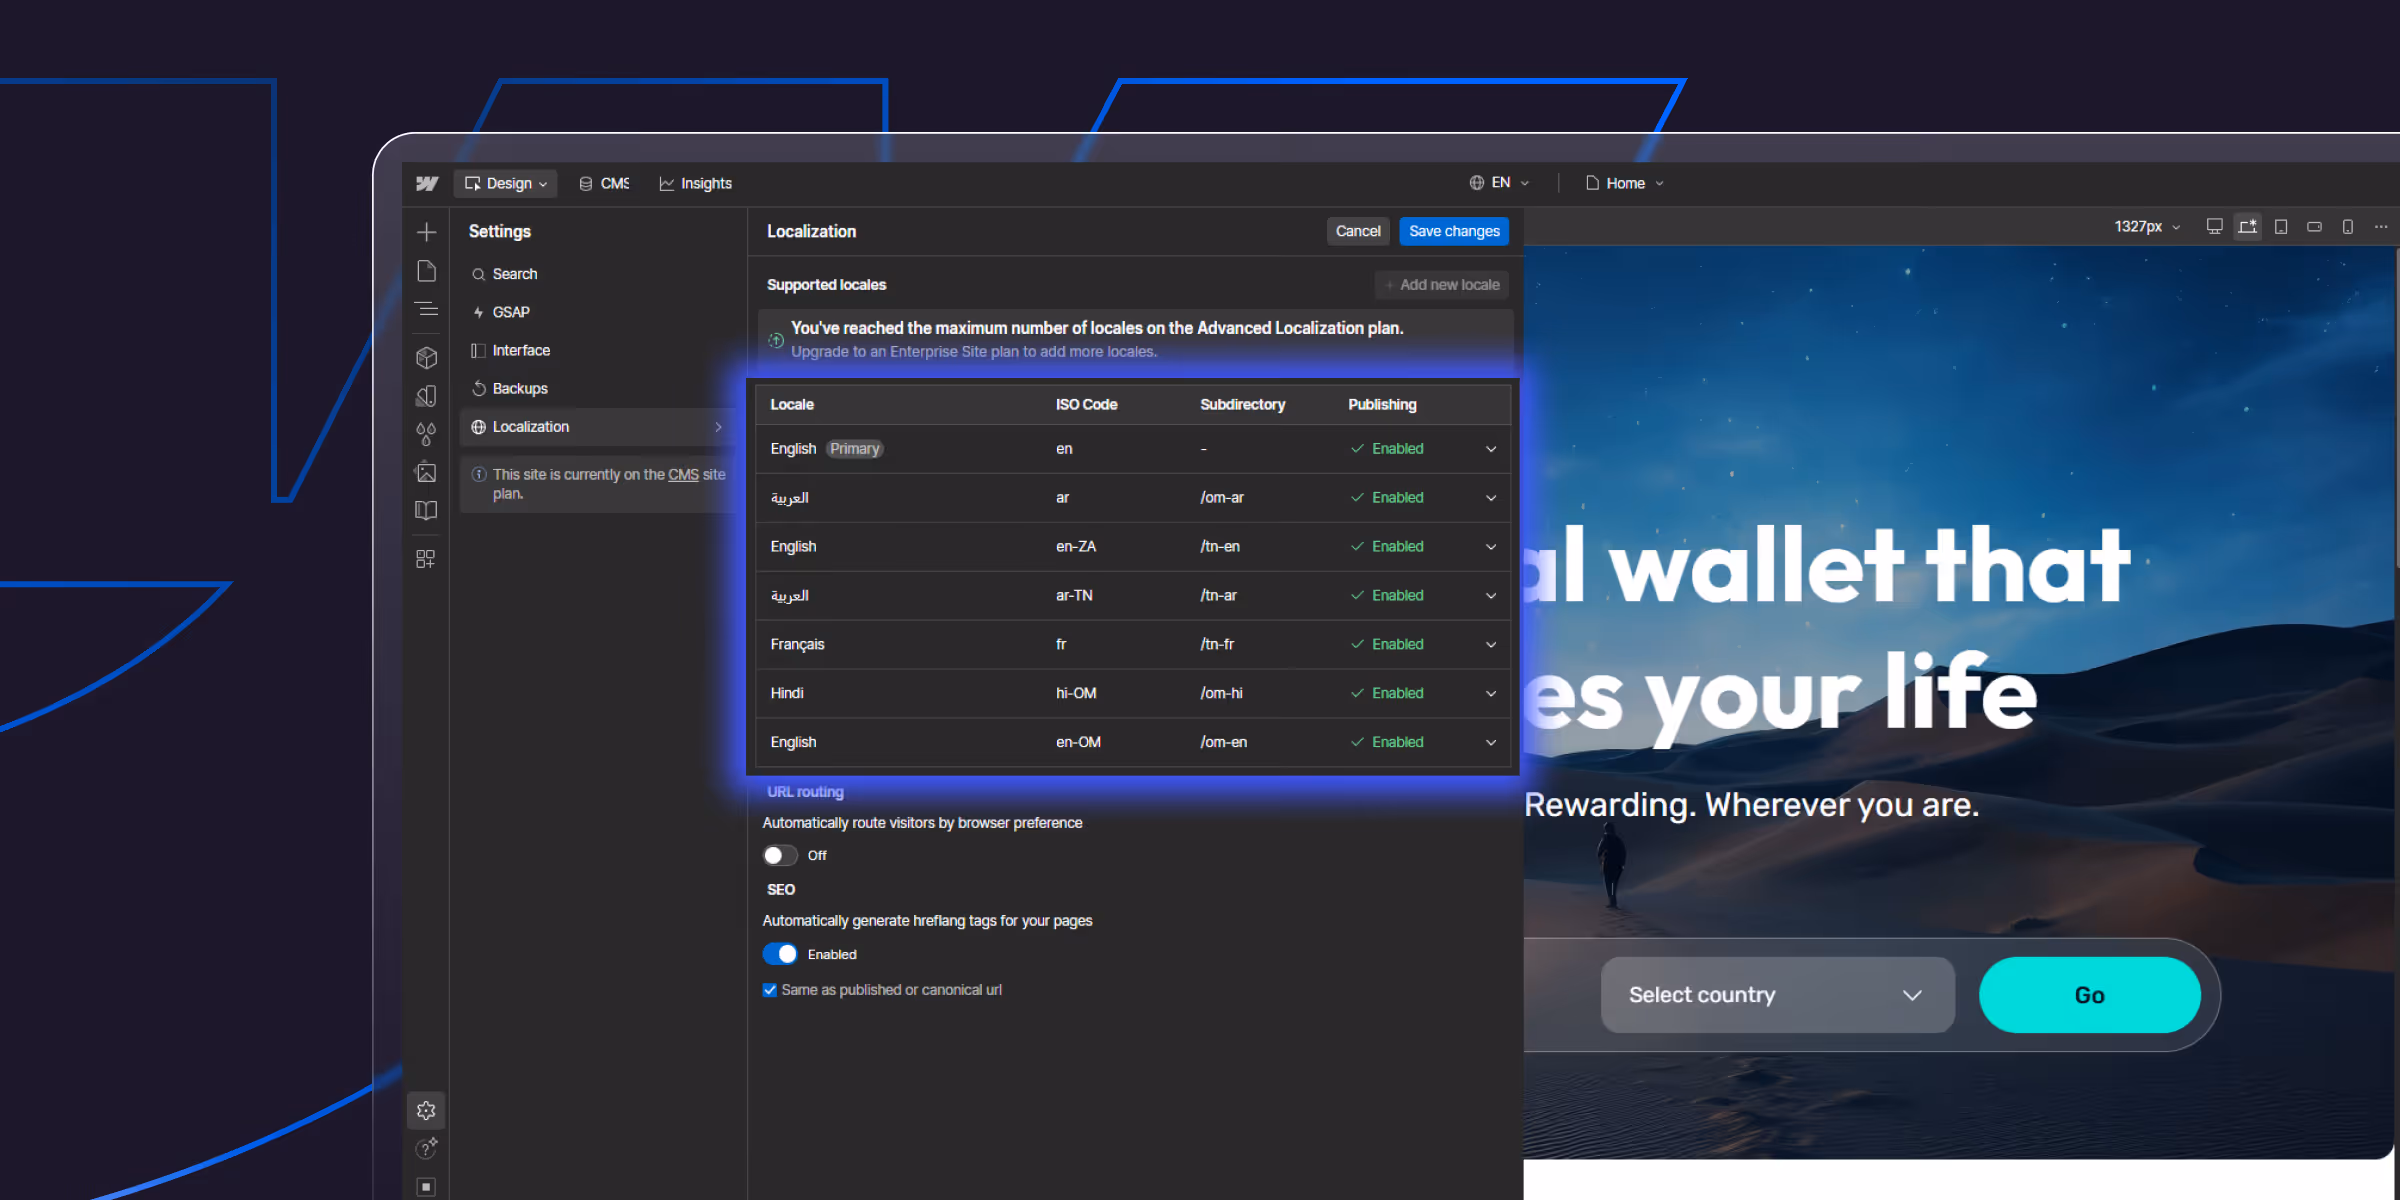
Webflow Localization is a paid add-on available on top of your existing site plan. It is not included in any base Webflow site plan (Basic, CMS, Business).
Localization plans are billed separately from your workspace and site plans. If you need more locales than the Advanced plan allows, you must contact Webflow Sales for an Enterprise quote. The Essential plan is enough for most small businesses adding a single secondary language. The Advanced plan is the standard choice for sites targeting 3–5 regional markets.
If Localization costs are prohibitive, Weglot starts at $17/mo for 1 language and 10,000 words often cheaper for low-word-count sites but becomes more expensive as content grows, since Weglot pricing scales with word count rather than locale count.
Step 1: Navigate to your navbar or header
Step 2: Add Dropdown element
Step 3: Customize dropdown button
Step 4: Add Locales List element
Step 5: Structure the Locales List
The Locales List works like a Collection List with three main components:
Complete structure hierarchy:
Navbar
└── Dropdown
    ├── Dropdown Toggle (button showing "Language")
    └── Dropdown List (opens on click)
        └── Locales List
            └── Locale Item (auto-generated for each language)
                └── Locale Link
                    └── Text or custom content
Customizing dropdown appearance:
Step 1. Select the Dropdown element
Step 2. Style the Dropdown Toggle (button):
Step 3. Style the Dropdown List (menu):
Styling locale items:
Step 1. Select the Locale Item in the Locales List.
Step 2. Apply styling that will repeat for all languages:
Step 3. Style the Locale Link:
JavaScript-Based Language Switching
When custom code is needed:
Multi-project scenarios:
When each language version exists as a separate Webflow project, JavaScript creates links between them while maintaining the current page path.
Example: English at `example.com`, Spanish at `es.example.com`
Custom code maintains the URL path when switching:
Subdomain Implementation Steps
Step 1: Create toggle button element
Step 2: Add JavaScript code
Navigate to Page Settings > Custom Code > Before </body> tag:
<script>
// Language switcher for multi-project setup
let toggle = document.querySelector('.language-toggle');
let domain = window.location;
let slug = domain.pathname;

// Define your alternate language domain
let alternateDomain = 'https://es.yoursite.com'; // Change to your domain

toggle.addEventListener('click', switchLanguage);

function switchLanguage() {
  // Redirect to alternate domain with same page path
  window.location.href = alternateDomain + slug;
}
</script>
Customization for your setup:
For bidirectional switching (two-way between languages):
<script>
let toggle = document.querySelector('.language-toggle');
let currentDomain = window.location.hostname;
let slug = window.location.pathname;

// Define domains for both languages
let englishDomain = 'https://example.com';
let spanishDomain = 'https://es.example.com';

toggle.addEventListener('click', switchLanguage);

function switchLanguage() {
  // Check current domain and switch to alternate
  if (currentDomain.includes('es.example.com')) {
    window.location.href = englishDomain + slug;
  } else {
    window.location.href = spanishDomain + slug;
  }
}
</script>
For multiple language options (3+ languages):
<script>
// Get all language toggle buttons
const languageButtons = document.querySelectorAll('[data-language]');

languageButtons.forEach(button => {
  button.addEventListener('click', function() {
    const targetLang = this.getAttribute('data-language');
    const currentPath = window.location.pathname;

    // Define language domains
    const domains = {
      'en': 'https://example.com',
      'es': 'https://es.example.com',
      'fr': 'https://fr.example.com',
      'de': 'https://de.example.com'
    };

    if (domains[targetLang]) {
      window.location.href = domains[targetLang] + currentPath;
    }
  });
});
</script>
HTML structure for multiple languages:
<div class="language-switcher">
  <button data-language="en">EN</button>
  <button data-language="es">ES</button>
  <button data-language="fr">FR</button>
  <button data-language="de">DE</button>
</div>
Automatic switcher generation:
Weglot automatically adds a language switcher to your site upon integration. The switcher appears in the bottom-right corner by default but can be repositioned.
Implementation steps:
Customization options:
Clone-ready templates:
Weglot provides pre-designed switchers you can clone directly in Webflow:
Native Webflow integration:
Polyflow syncs directly with Webflow CMS and Designer, providing a more native experience than other third-party tools.
Custom URL management:
Polyflow allows custom URLs and subdirectories per language, maintaining SEO best practices with proper slug structure.
Styling flexibility:
Since Polyflow syncs with Webflow, you style the language switcher directly in the Designer like any native element.
Implementation process:
No-code setup:
Elfsight provides a visual editor for creating and customizing language switchers without touching code.
Widget customization:
Embedding process:
Custom language switcher design tailored to your brand creates unique, on-brand language selection experiences that exceed standard implementations. Our design team creates switchers that integrate seamlessly with your visual identity while maintaining optimal usability.
Complex multilingual setups require expertise that theCSS Agency provides through 150+ multilingual Webflow projects. We handle advanced scenarios, including multi-project coordination, custom URL structures, geo-targeting, and enterprise-scale implementations.
Performance optimization ensures language switchers load instantly and switch seamlessly without degrading site speed. Our technical approach balances functionality with performance, maintaining fast load times even with multiple language versions.
Implementing a language switcher in Webflow transforms single-language sites into accessible global platforms that serve international audiences effectively. The three implementation methods covered-native Locales List, custom JavaScript toggles, and third-party solutions-each serve different technical requirements and project contexts.
Webflow's native Locales List provides the most streamlined path for new multilingual implementations, offering automatic integration with localization settings, no-code setup, and optimal performance.
Custom JavaScript solutions serve specialized needs, including multi-project setups, legacy implementations, and Basic plan projects.
Third-party integrations simplify deployment through automated solutions but introduce external dependencies and ongoing costs.
Ready to implement a professional language switcher that enhances your Webflow multilingual site's user experience and drives international conversions? theCSS Agency specializes in custom multilingual implementations combining technical excellence with conversion-focused design. Our proven approach delivers switchers that work flawlessly while matching your brand's visual identity.
Schedule your multilingual consultation today and discover how professional language switcher implementation can transform your international user experience and global growth.
Webflow now has native multilingual support via Webflow Localization. Enable it in Site Settings → Localization, add your target locales, then add the Locales List element (Add panel → Advanced) to your navbar — it auto-populates with all enabled locales and handles language routing natively, no code required. Webflow Localization is a paid add-on (from $9/mo for 2 locales). For sites needing more control over translation management, Weglot provides automated translation with its own switcher widget. For multi-project setups (separate Webflow projects per language), use custom JavaScript to maintain page path when switching between domains.
With Webflow Localization (Site Settings → Localization), you can create fully translated versions of your site. Enable a locale, translate content in the Designer's locale editor, and publish Webflow handles URL routing (subdirectory or subdomain) and serves the correct language version automatically. For third-party translation via Weglot, install the Weglot script in your site's Custom Code; Weglot detects browser language preference and switches content automatically. Language preference can also be stored in a cookie so returning visitors see their preferred language without re-selecting.
Yes, there are free ways to create a language switcher in Webflow. You can manually duplicate pages for different languages and connect them using navigation links or a dropdown switcher without using paid tools. Some third-party translation tools also offer limited free plans, but fully automated multilingual functionality usually requires a paid subscription for advanced features and SEO support.
You can add hreflang tags in Webflow by inserting custom code inside the page settings under the Head Code section. Hreflang tags help search engines understand which language version of a page should be shown to users in different regions, improving international SEO and preventing duplicate content issues. Translation tools like Weglot can also generate hreflang tags automatically.
The best way to create a multilingual website in Webflow depends on your goals. For strong SEO performance and full control, manually creating language-specific pages using subdirectories is the most effective approach. For faster implementation and easier management, translation tools like Weglot provide automated workflows, language detection, and SEO optimization without complex development.


Sanket Vaghani has 8+ years of experience building designs and websites. He is passionate about building user centric designs and Webflow. He build amazing Webflow websites and designs for brands.
How Webflow Interactions work: trigger types (scroll, hover, click, page load), step-by-step setup, common use cases, GSAP integration, and troubleshooting when interactions don't fire.

Learn how to build a high-impact B2B SaaS SEO strategy that attracts qualified leads, boosts rankings, and drives consistent revenue. Step-by-step framework with real growth tactics
A Webflow Premium Partner is an agency at the top tier of Webflow's official partner program.
Quick Turnaround. No Contracts. Cancel Anytime. Book a 30 minutes consulting call with our expert.