


Webflow Premium Partner: What It Means and Why It Matters
A Webflow Premium Partner is an agency at the top tier of Webflow's official partner program.
Actionable insights to improve SEO, speed, and conversions
Webflow can generate an XML sitemap automatically. Turn it on under Site Settings → SEO → Sitemap by toggling "Use auto-generated sitemap," then publish. Your sitemap is then available at `yourdomain.com/sitemap.xml`. For full control, paste your own XML into the same field instead. After publishing, submit the sitemap URL in Google Search Console.
An XML sitemap is a file that lists every URL on your site that you want search engines to crawl. Webflow generates one automatically for every site and hosts it at yourdomain.com/sitemap.xml — but the auto-generated version doesn't always reflect what you actually want indexed.
This guide covers how Webflow's auto-sitemap works, how to find your sitemap URL, when to use a custom sitemap, how to exclude specific pages, and how to submit your sitemap to Google Search Console.
An XML sitemap lists all URLs on your site. It tells search engines when pages update and how often they change.
If you run a blog with many posts, a sitemap helps Google find every article. Even old posts buried in your archive get indexed.
Sites with proper sitemaps are 30% more likely to get indexed correctly. That means better visibility and more traffic.
Search engines crawl billions of pages, but they miss things. A sitemap guides them to your best content.
Here's what a sitemap does:
A sitemap is essential if you want better rankings.
Webflow helps you build stunning sites. But without good SEO basics, even beautiful sites fail.
XML sitemaps are extra important for Webflow because:
A published Webflow sitemap lives at `https://yourdomain.com/sitemap.xml`. This is the URL you submit to Google Search Console and Bing Webmaster Tools. It only exists on the published site, so confirm you've published after enabling the toggle.
If the sitemap page returns a 404:
The sitemap regenerates automatically every time you publish there's no manual refresh button.
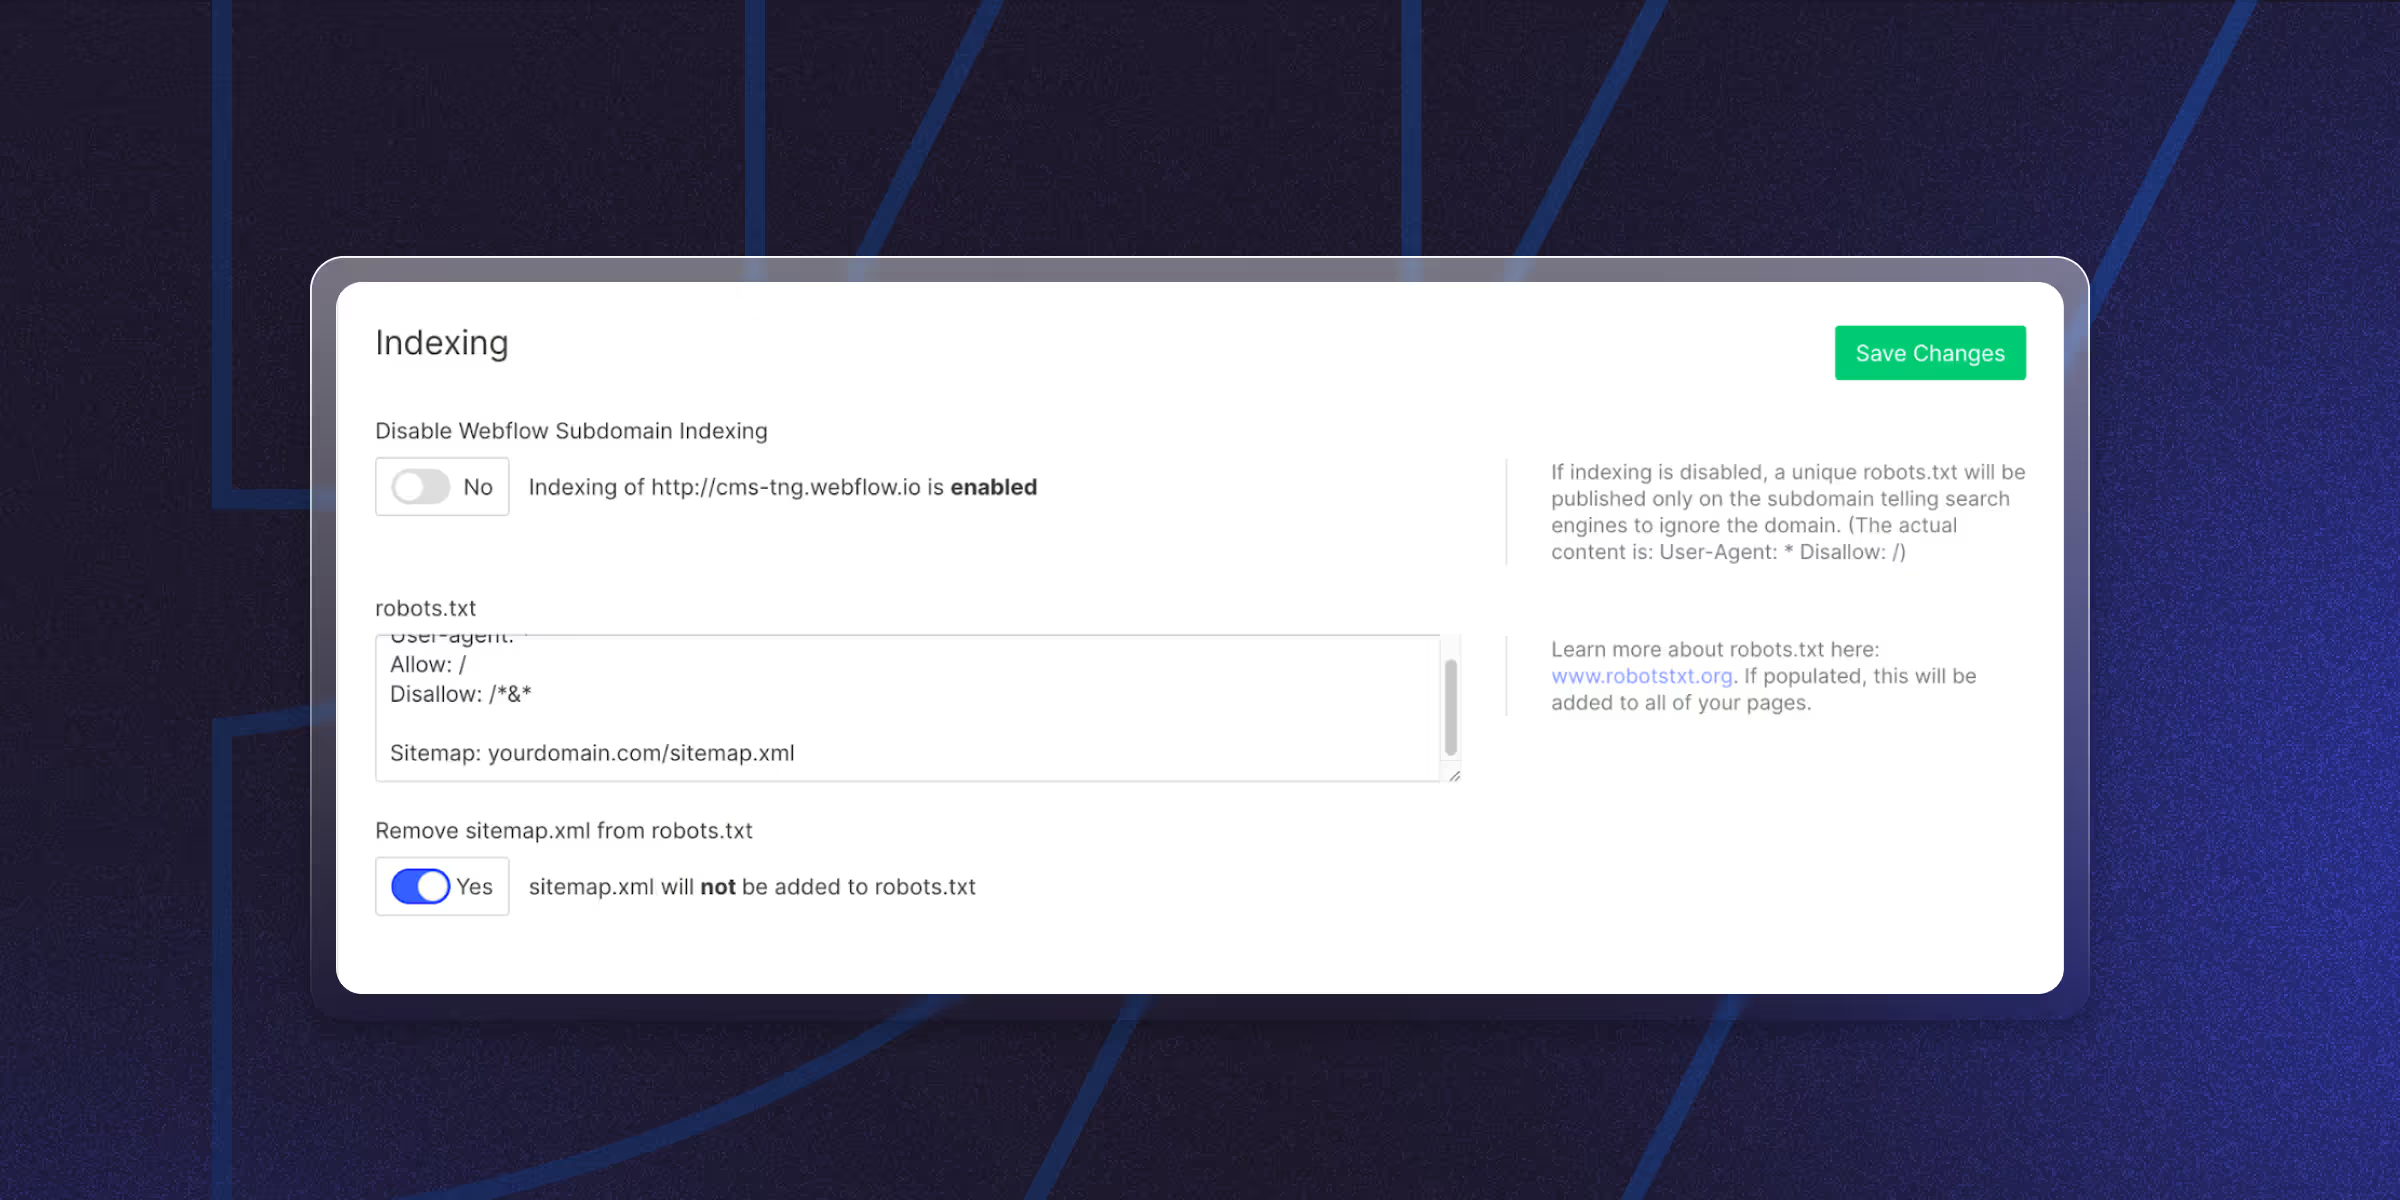
Webflow's auto-generated sitemap includes every published page and every CMS Collection item. Use a custom sitemap when you need to exclude specific URLs, set custom priority values, or include URLs that Webflow doesn't know about (like externally hosted pages).
This automated option works well for most users.
Steps-by-step:
For more control, build a custom sitemap.
This works best for advanced users.
Tools like Yoast SEO or RankMath give you extra control.
These help if you manage complex sites or need special features.
In Google Search Console, open Sitemaps in the left menu, enter `sitemap.xml` in the "Add a new sitemap" field, and click Submit. Google will fetch it and start using it to discover pages. Re-submission isn't needed after each publish - Google re-crawls the same URL automatically.
Google Search Console steps:
Bing Webmaster Tools uses a similar process. Check back often for errors.
Get more from your sitemap with these tips:
Here's how to solve typical issues:
Webflow auto-includes every published page in the sitemap by default. To exclude a specific page (e.g., a thank-you page, a duplicate landing page, or a noindexed page):
The page will be removed from the auto-generated sitemap on next publish. For CMS Collection items, toggle Sitemap Indexing off at the Collection template level Webflow doesn't support per-item exclusion through the UI.
For larger exclusion needs (whole folders, conditional logic), switch to a custom sitemap instead.
A good XML sitemap helps search engines understand your site. Use Webflow's built-in feature, make one manually, or try third-party tools.
The important part is making sure search engines can navigate your site easily.
Ready to level up your Webflow site’s SEO? At theCSS Agency, we specialize in crafting SEO-optimized sites that drive traffic and conversions.
Yes. Webflow creates sitemaps automatically when you enable the feature in SEO settings.
Visit yourdomain.com/sitemap.xml. You can also check it in Google Search Console.
Yes. Remove thank you pages, admin areas, and test pages so they don't get indexed.
Webflow updates it automatically when you publish. Manual sitemaps need updates when you add or remove pages.
No. Webflow makes one sitemap for your whole site. Large sites need manual setup for multiple sitemaps.
Not directly. But it helps Google find and index pages faster, which can boost visibility over time.
Webflow regenerates the auto-sitemap on every site publish. There's no scheduled regeneration — if you change content but don't republish, the sitemap stays stale. For high-frequency content sites, make republishing part of your editorial workflow.
Three common causes: (1) the page has Sitemap Indexing toggled off in Page Settings, (2) the page is unpublished or in draft, or (3) the page is noindexed via SEO settings, which Webflow uses as a signal to exclude from the auto-sitemap. Check all three before troubleshooting further.
Go to Google Search Console → your property → Sitemaps in the left nav. Enter <code>sitemap.xml</code> in the "Add a new sitemap" field and click Submit. Google will fetch the sitemap immediately and recrawl your URLs over the following days. Resubmit after major content updates.


Viken Patel has 17+ years of experience working with websites. He is passionate about building website that converts. His marketing background helps him build the sales driven websites.

A Webflow Premium Partner is an agency at the top tier of Webflow's official partner program.

Learn how to build a high-impact B2B SaaS SEO strategy that attracts qualified leads, boosts rankings, and drives consistent revenue. Step-by-step framework with real growth tactics

Programmatic SEO on Webflow means generating many landing pages from one CMS Collection template one page per.
Quick Turnaround. No Contracts. Cancel Anytime. Book a 30 minutes consulting call with our expert.